Project proposal
The title of my final project is ‘unity’. Working as a group of three, we are going to create an independent short film, focusing on each aspect individually. We are going to, as a group, create the storyboards, scripts and characters and then as the film is under production we are going to each focus on an individual aspect. I am going to main focus on editing and effects. This will cover putting the film together, choosing which shots work best for the scene, colour correcting and green screening. I will use programmes such as After Effects and Final Cut Pro. By the end of the project I hope to have a finalised film that reflects my potential skill I have in the area.
I started to think about what my potential influences are, where my starting points will be and contextual references relevant to my ideas. I am influenced by indie films produced independently as it massively reflects the potential we can have as a group. The starting point of our project is gathering ideas; we want to try to collaborate as many potential ideas from each other so that we are working towards something we all are enthusiastic to create. We plan to visit a number of locations to help with our ideas towards the film, also looking at film with the same genre type for inspiration.
For the most effective final result from my film, I am going to use a range of programmes and equipment to push myself further with my skills. Programmes I am going to use are Adobe After FX and Final Cut Pro. With the environment and materials we are going to use, it will help us develop our ideas along the way. Certain aspects of programmes available will be useful for performing certain tasks and getting certain outcomes. Using the right equipment and resources will allow us to meet our required film we wish to create. I am going to produce a time plan to plan when we will start each task. I will show the duration of the task and an expected outcome. This will allow me to manage my time as effectively as possible throughout the production of the film. I am going to do a series of research into certain films in the same genre type, mainly looking at indie films and possibly thrillers. This will give me the opportunity to reflect back my work to what I originally wanted the film to be like. This will help keep the film on track of what I want the outcome to be.
Independent research
I am going to aim my research on other films within the same genre of my proposed project. These films are going to be shorts that hold a lot of meaning and other indie films produced independently. For creative plot ideas for my film, I am going to start looking at big popular films that focus around a single main character and how they show the emotions in that character without direct dialogue. I am then going to look at indie films that are produced with similar resources and time that we will have. This will give me an idea of the type of outcome we can produce and will also help set a target for us to aim and achieve.
The first large film I am going to look at is ‘Into The Wild’. This film is based around a character who wants to live outside of society and runs away from his home life. The entire film is revolved around this character and his progression through his new life. When watching the film, I am going to mainly focus on how the main character’s feelings and emotions are presented using body language and indirect dialogue.

Into the wild has a lot of creative scenes throughout the film, showing large ambient looking shots. This is used to reflect the sense of freedom that the film is trying to portray with the main character. In early scenes when Christopher McCandless is surrounded by his parents and college pressure, the camera shots are very close and personal. This shows an uncomfortable feel that is being reflected by both the character and the camera. This gives ideas of potential uses of the camera that I will be able to influence into my film. I can make the use of the lighting and camera angles to show the development of emotion that is displayed in the main character.
Another key element to this film that I discovered was the use of the soundtrack throughout the film. Each soundtrack perfectly replicates what is happening on screen and helps add to the large freedom effect that the film portrays. A significant scene to show this is the scene when Christopher reaches the summit of a mountain in Alaska and looks out into the large wilderness. The camera follows him up the mountain closely as if to hide what the final view will be for audience, adding tension and excitement. As he reaches the top the camera pans around him, giving a large widened view. This works well as when he looks into the view the audience then gets to experience it. The soundtrack during the scene is also progressing in the same sense.

A significant director I have decided to look at is Danny Boyle. This is due to his significant films such as Trainspotting, Slumdog Millionaire and 28 Days Later. He uses a unique style to present important messages through out his films.
Another director who influences me is Christopher Nolan. He is famous for directing films such as ‘The Dark Night’, ‘Interstellar’ and ‘Inception’. Another key aspect about Nolan that stood out for me is he lack of using storyboards in his work. He takes more of a lenient approach when directing and only majorly uses storyboards for action scenes that have to be re-acted perfectly.
Here is a quote from an interview with Nolan explaining his use of storyboards:
“In the DVD commentary you mention that you often work without shot list or storyboards. Do you find it difficult to communicate to the crew what your intentions are?
I don’t think I do. No, that’s probably why I don’t tend to use them that much. I use storyboards for action scenes because obviously when you’re dealing with stunts and intricate physical effects you have to be pictorially demonstrating to everybody exactly what it is you’re after. I find beyond that I’m able to communicate to the crew and to the actors what I’m after using words, blocking, and actually being there on the set and showing them what’s going on. To me it’s a slightly more spontaneous way of working for most sequences in the film, particularly one that’s very dependent on the performances than the pyrotechnics. I think that it’s very important to be open to changing the way you shoot the scene depending on what the actors want to do in moving around the scene. The physicality of the scene is very important to the actor. I like to try and give them room to maneuver so that in our rehearsals we can find the best way to play a scene and the best way to photograph it.”
Film Plan
With my film I am going to take the more lenient approach when directing by not producing a storyboard, but explain to actors when in character what will be most effective for that moment. As I am majorly going to be focusing on character development throughout my film, I want to make sure this is presented in the most natural way possible and I feel as if a spontaneous approach will help this effect.
I am going to be working in a group of three to produce out final project. As a group meet regularly to mind map ideas together, as well as each of us doing independent research. This allows us to gather ideas from different areas to help influence our ideas.
One of the first discussions we had about the project was that we want to introduce a key main character that is going to take the audience through the story. We want the character to be likeable and also influential in the sense that they are living on the edge. This helped us build our plot idea.
We want to start the film with our character at the peak best of their lives. The target audience that we are basing our film on with be late teens that will be able to relate to the plot. The opening scene will show our character leaving a tent near the beach, he will then walk along with the camera following him along the way. As he walks a series of different events will be shown, such as groups of people asleep, bottles and food on the ground and burnt out fires, indicating there was a party the previous night. He will then walk out of the area with the events and will look out into the view. The title screen will show up stating ‘The Wanderer’. A close up of his emotions will be shown as he smiles. The scene will then transition to him at school where the same close up is being shown, just with a sad expression.
The film will then indicate that this scene is three years prior to the other opening scene. The character will be in class as all of the students leave at the sounding of a bell. The teacher will then proceed to ask the character to stay behind as he needs to speak to him. There, the audience will find out that he is failing his classes and is being shouted at by the teacher. This entire event with the teacher will all be one continuous shot as the camera slowly moves back. Towards the end of the teacher dialogue, he will ask ‘What would your parents think of this’, there will then be a transition to the character sitting in the same position with the same expression at home. His parents will be standing in the same area where the teacher was shouting at him. This will instantly let the audience become aware that his life in this moment is not good both at home and in school. In both the teacher and the parent dialogue, there will be indications that this is an on going occurrence.
The next scene will show the character in his room. This is the first time we are alone with the character and this will be shown with the music softening. This is where the plot of the film will begin to unravel as the character starts taking bizarre actions. He will begin to start cutting up identification, packing bags of essentials such as clothes and money and will then unexpectedly leave without informing his parents. The next few scenes will show the character independently living in the world by himself. It will start in areas more built up until he finally leaves to the country where there is no civilization. Later on, the character will meet a group of other teenagers that are also living outside of civilization, doing what they want. Towards the end is where the beach scene will happen again, prior to the opening scene. The final shot will be the emotion on his face, showing that he is finally happy in his life. The message behind the story will be to simply live happy.
Location shots
As a group we went and found locations that would be suitable for the production of our film. We decided to drive out to a small beach that is around 15 minutes from the closest town. The area is greatly built up with fields and is very quiet for people, making it an appropriate location to set the first and final scenes. We took photos reflecting what actual scenes of our film will look like. I also decided to make certain photos into a film poster style so that the photo could work in more context towards our film.

This was a practice shot of Rhys crouching on a rock looking out to the sea. This shows the large open area that we will be able to emphasis in our film with super wide shots. This is the exact location where we film our first and final scenes of our film. Rhys is acting as the lead character of the film, showing potential wide shots we could get, including both the character and the scenery.

Here is a picture of me acting as the character on the beach. This is the area where we would film the first scene located on the beach. We tried a variety of different beach camera shots, trying to involve the surroundings as much as possible.

This is an example of a wide screen shot we would try for the title screen. We would film at a time of the day where the tide is in on the right meaning it is water instead of mud. With the title added to the photo and a high contrast level, it helps make the photo work better in context of our film.
Here are some other shots we got on location:


Overall this is an effective area to film the ‘freedom’ parts of our film. These are the scenes of the film where we will show the character being ‘free’ from society. Due to the large open environment, we will be able to use creative techniques to show the new emotions of freedom within our character. With the scenes that are set when he is unhappy, we will be able to use tight inside areas and close up shots, such as small corridors and rooms with dull lighting. This will also help reflect the characters emotion using the location and environment.
Here is a test shot we did for that day:
 (CLICK IMAGE FOR VIDEO)
Timeplan
In order to produce our film effectively we are going to need a set time for each aspect of the creating process. The two main aspects will be the filming and editing. They will not necessarily be in this order as when one scene is filmed we may begin to edit this section.
Task one
The first task will be filming the inside scenes set in a school. This will involve getting a small classroom of students that will leave at the sounding of a bell. There will also be a teacher that will have some dialogue. We will be able to film this scene inside out college. This should be one of the easier scenes to film as we will be able to film it during lesson with members of our class as student extras. This task will involve us setting up the camera slider and getting one continuous shot for the entire scene. We will experiment with a variety of different angles and we may potentially have a few breakdown shots after the camera pan. I expect the duration of this task to be about 1-2 hours in total.
Task two
The second task will be to film the scene set inside the house. We will need two parent figures for this scene. There will be a slow backwards panning camera continuously throughout the shot which will be linked directly from the previous scene. This scene will then link directly into the following scene where we are alone with the character for the first time. All of these scenes will be filmed in location that represent the characters emotions as stated previously. For example, when the character goes to his room, it will be small with dull lighting until he ‘escapes’ and the entire film will open up. This task will also involve us setting up the camera slide to show one progressive shot that links from the previous scene.
Task three
The third task will be film the scene where the character enters his room. This scene will show a more lenient approach with camera. For example, if the character is going up stairs, there will be a slightly shaking shot to give the perception of rapid movement within the character. This scene will then lead to a series of events, unfolding the story for the audience. Here, we will show multiple close up shots of the different events, rapidly occurring one after another. We will have ID, documents and other personal information being destroyed and cut up to show the character’s rejection towards society.
Task four
In this task we are going to begin filming scenes in multiple locations to show the character’s escape. These scenes will be the most lenient and least planned as we have many events that we will be able to include in these scenes. We are going to make sure that we show progression of the character’s life throughout multiple scenes. The more the character becomes lost and away from his life, the happier we will show him become. We will have music to present the events that we will create ourself, mainly including large ambient sounds that are peaceful and reflect the character’s emotions. Towards the end of these scenes we will show the character meeting another group a free minded teenagers in a similar position
Final task: Five
In this scene we will show a repeat of the first scene. The character will be living his new life at the end with the new people. There will be many large ambient shots with peaceful music to set the scene. The film will show a re-occurrence of the events prior to the first scene, where the final shot will show the character looking out to the view, smiling. The film will then fade to black. We plan on shooting this entire scene at one location, the same location as where we shot the first scene.
Beginning of filming
When we were at our scene location for practise shots, we decided to take practise shots of certain scenes. The video below is a practise shot of Rhys playing the lead character as we walks up a hill and a large view is then shown. This scene occurs at the beginning of the film. This shot is a medium shot, leading to a close up. We will then be able to link in larger wide shots and the environment opens up.
The camera we’re using is a Cannon DSLR (650D) T4i. This camera is suitable for the job as it has mulitple iso settings and can shoot in 1080p. This means scenes where there is dim sunlight we will be able to adjust the settings on the camera to get the most appropriate pick up. We are also using a Rhodes boom microphone for our audio pick up. This microphone is suitable for the task we are performing due to the shotgun polar pattern, meaning the audio pick up is very frontwards based.
Throughout the filming production, me and Scott will be sharing camera work as well as sound. As a group we will all direct when necessary, making sure each scene sticks to our story plan. Rhys being the main character will make most of the decisions to what he thinks the character should be doing the current situation, me and Scott will then judge as to where the best angle and location for each shot we be, depending on where and what the character is doing. We are taking a lenient approach to the production and will all give an equal input about what is necessary for that scene.
(Rhodes microphone):


(Shotgun pick up)
This is a shotgun microphone’s polar pick up pattern. As shown in the image, the majority of the pick up is directly in front of the microphone, although there is slight back and side spill. This is good for the tasks we want to perform as we are going to be able to direct the microphone towards what we wish to pick up and we will get good audio response.
We also used additional settings on the camera to make sure that we were filming everything in a widescreen aspect ratio and were getting the most accurate focus response. We used focus peaking on the camera to make sure that everything was in focus when filming.


Here are some examples of the focus peaking. All the red dots shown on screen are where the object in view are in focus. All of the blue dots show the out of focus points. Using this feature made the overall filming more practical and time saving as we could quickly focus on different objects more accurately. These photos also show the widescreen aspect ratio we set up onto the screen to make sure we were getting everything central to the screen.

Here is an image of a script written up. We used this for the first scene with the student and the teacher. (Note: Character’s name changed from ‘Josh’ to ‘Angus’)

We went to a suitable field to film the first part of the wandering scene. We chose an area that had suitable setting. This field was located in Woodham and had a very open area with long grass. We got a few shots of our character walking through the grass and lying down in mulitple locations. This scene is going to occur after he has ‘escaped’ and has left the town/city area.

Here is a picture of us filming the walking part of the scene. This is a long shot of the character walking. We used a camera stabiliser to get a very steady shot with very slight camera movement. We made sure that the character walked through the centre of the shot in this scene for the best effect when in a widescreen ratio.

Here is a photo of us getting the lying down shot. We slowly panned the camera above the character creative effect. This scene shows the character’s happiness as he is lying down in the long grass. The lightening of the entire scene also helps emphasise this.

This photo was taken when filming the first classroom scene. We set up a camera slider so that we could shoot multiple slow panning camera movements towards the character. We did multiple shots, making each one look like a separate day by changing the character’s clothes in each one. We used a feature on the camera called ‘ghost imaging’. This allowed us to line up and centre the character in the next scene perfectly in line with the previous scene. This gives a smooth transition between the scenes as the alignment is consistent.

Here is a photo of one of the inside scenes. We made sure to get as much lighting as possible in this scene for the best quality effect. The more lighting involved will reduce the amount of grain in the footage. We will be able to tone down the lighting using colour correction in Final Cut. This will not effect the quality of the image.


With the steady camera holder, we decided to get low shots of the character when walking in this ‘wandering’ scene. This gave an effective result in playback as the camera smoothly followed the character and slowly raised up showing the entire area.

This photo shows one of the wider shots we set up for the car scene in the film. This area was suitable for the scene as it was very open meaning we could get wider shots.

After this scene we decided to progress to a forest near Heybridge for more wandering scenes.


In this scene we did multiple quick shots of our character building a fire. In the editing process we can quickly chop up all of the footage, making it a quick little scene showing the survival skills of our character.


(Omnidirectional pick up)
We also decided to use a portable condenser microphone to pick up external background noise of the forest. We decided to use this microphone instead of the boom microphone as this have a much wider pick up range and his crisp sound quality. This will be effective when added to our film during these scenes as it will help build up the atmosphere. We also decided to use the microphone to pick up natural ambience from the high street. This allowed us to capture more of the ‘noise’ and enhance the character’s claustrophobia.
When using the microphone in the forest, we used the omnidirectional pick up setting. This means we captured audio from all around. This picked up natural ambience of birds tweeting, footsteps and the wind hitting the leaves.

We found a lake where we decided we could do even more additional wandering scenes. We decided to film multiple activities by the lake, including our character swimming.

Here is a picture of Rhys in the lake. We also used a Go-Pro to get underwater shots and first person perspective shots within the lake.

As part of our final scene, our character gets picked up by a group of people. The characters gets introduced and meets each character in the car leading to the final scene. To get the most effective shots, we decided to film the car as it drove along from the outside. To do this we got Scott to sit in the boot of another car while he filmed my car driving.

We also got still shots from out side the car as the car drives along. We will be able to split the shots up to show a progressive driving scene.

We also set up the Go-Pro inside the car to get a full inside shot of all four of us while driving. To get other conversation shots inside the car, we got Scott to sit in different seats of the car, filming each character as they said their lines. We repeated the scene over and over until we had a shot of everyone’s dialogue while in the car.


For the final scene we returned back to the place where we got the images for out scene location earlier on in the project. We decided to go here more towards sunset time so that we had a nice lighting effect. We shot progressive walking scenes along the way and then filmed the arrival of the character. The part where the character runs up the hill to look out to the sea will also be the very first scene in our film. We had to change this scene due to timing and extra character count. The original plan was a party scene where the character progresses to the location, but we changed it so that the character emerges to the location when he meets the group of people.
Editing

For each shot where we used a boom mic, we made sure to clap when recording so that we could line up the audio peaks of the audio track on the camera with the external microphone. The green track is the separate audio recorded by the boom microphone. We aligned the clap peak from the boom audio to the clap peak audio pick up from the camera so that it was perfectly in sync.

Here is some colour correction we applied to the bathroom job scene. We decided to make the scene look cold and more dull by making the blues stand out more.

Here is colour correction on the intro scene with Rhys. We wanted to make the entire film look good by standing out colours that usually are neutral.
Throughout the film we decided to to colour correct the scenes and adjust the saturation levels. In some scenes where it was darker we decided to reduce the darkness in the blacks, making the scene less grainy and more clear.

Here is an example of before and after colour correction:
 Before

After
We also decided to have character narration throughout the film. To do this we wrote a script for the character dialogue and then used our condenser microphone with the direct USB plug in to record straight into Final Cut.


This is the typed script on screen up with our film during the editing process. This is where we recorded the audio narration.
Film Link:
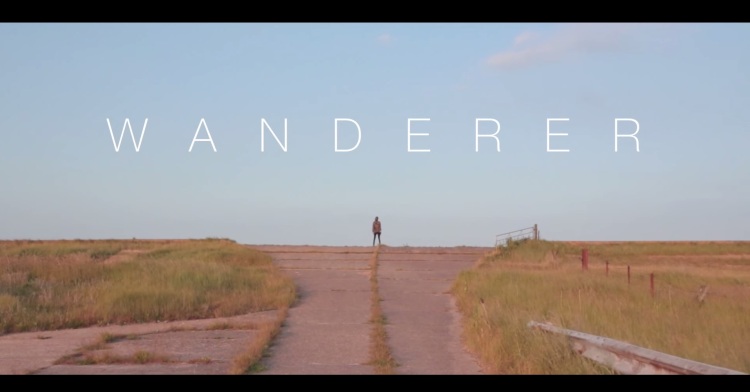 (CLICK IMAGE FOR THE FULL FILM)
Evaluation for film
Overall I am happy with the outcome of our film. We had to briefly change a few scenes due to timing and the availability of character extras. For example, the introduction scene was meant to be a camera pan with a series of events unfolding until the character met the sea wall. Instead we kept the same concept and had the character with two unknown character’s running up the sea wall until he looked out to the view. This is then when the title appears, then the next scene goes to the character in college which is based before the title screen event.
Aspects I like and enjoy
My favourite scene in the entire film is the forest scene where he first enters. This is because each shot looks very ambient and professional. This scene sums up our intention with the entire film and how we intended it to look. The feeling in this scene gives a true ‘Wanderer’ feel.
 (Screenshot from scene)
I also liked some of the scenery shots from this scene. We decided to do close ups of branches and bugs to get the full effect of the natured area. We also quietly played the sounds picked up from the ambient condenser microphone behind the music. This gives an added effect of the atmosphere.

Another aspect I enjoyed about the film is the overall simplicity. This means we could stick to our general original plot throughout the film. There was no moment throughout where the film spiralled out of control. The film still presents the same message from start to end, showing the simple escape of a man leaving society. For me, the message being send and it’s effectiveness on the audience is incredibly important in the production of a short film and I feel as if my film managed to achieve this.
Aspects I would improve in a later project
If I was to do a similar project in the future there would be a few production errors that I would have tried to avoid. The first one is audio dipping in only certain places. Due to the fact that we had narration audio and songs at the same time, we had to dip the songs at certain points so that the audio of the narration was more prominent. At times this got a bit messy. There were certain points where the songs did not dip (for example in the scene where the character is packing his bag), this made it hard to hear what was being said. There were also parts where the audio for the songs would suddenly increase then drop back down.
Apart from slight audio issues, I am happy with the final outcome. I think the film represents what we wanted to create and show our audience. The overall message is about freedom and loneliness. It shows that doing what you wish will be the best thing for you. The simplicity of our film is proven effective.
